Using FireShot Pro
This manual helps you to install FireShot Pro and to get familiar with its basic features.
FireShot Pro Installation in Firefox, Chrome, Internet Explorer, Opera, Pale Moon, Seamonkey and Thunderbird
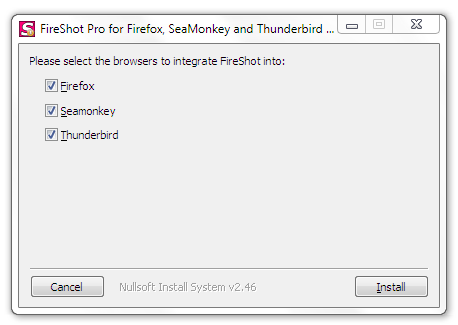
Download and save the installation file to disk. Please close all of your instances of Firefox, Internet Explorer, SeaMonkey and Thunderbird browsers and launch the downloaded file. The dialog appears and you can select the programs FireShot to be integrated into. After the selection performed, please click "Install".

When the installation is done, please run your browser.
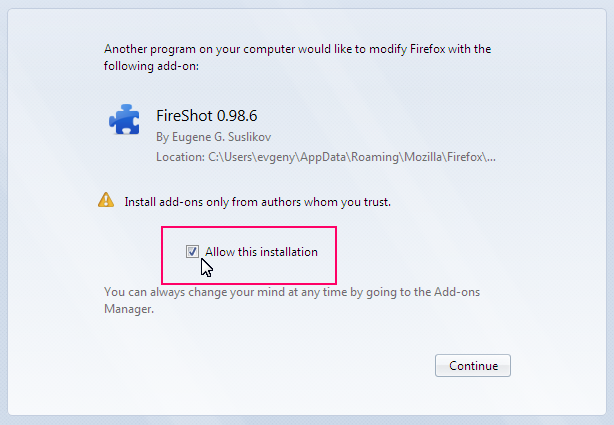
Depending on the previously installed version of FireShot, you might or might not be asked to allow FireShot to be integrated with your browser. Kindly accept the installation by checking the option shown below and click "Continue".
The dialog in Firefox:
The dialog in Internet Explorer looks slightly different:
You may be asked to restart your browser. Once the browser restarted you will be able to use your add-on. Normally you should see the "S" button at the upper right corner of your browser.
Firefox browser:

Internet Explorer:

Google Chrome:

FireShot provides new interface objects such as buttons and context menus and different customization options. Be sure to click on the Options button (if it has been enabled) in the Firefox Add-ons Manager, and also go to View > Toolbars > Customize to see if a new "S" button have been added.
Activating FireShot Pro
FireShot is available in two versions: a simple and free one and a Pro version. Though the simple version typically suits 80% of usual user's needs, there's a Pro version that provides a rich set of advanced features:
— Multi-editor interface. You can switch between captures, use clipboard to exchange annotation objects.
— Uploading to Flickr, Google Picasa, ImageShack, EasyCaptures. Use these services to store your captures at image hosting engine.
— Easily customized uploads to FTP and HTTP servers. For example, you can automate the bug-tracking engine you're using, or simply store images at your server.
— Organizing files into projects. Everything can be stored as a project without anything being lost. You can reload it and continue your work exactly from the place you stopped previously.
— Saving and Loading graphic files. You can add comments to your photos by dragging and dropping them onto the Editor. The files will be opened automatically.
— Work with clipboard. Copy any bitmaps to your clipboard in your favorite editor or take a screenshot by pressing Print Screen and open it in FireShot in two clicks. Have a nice screenshot in Internet Explorer? Now you can easily transfer it to FireShot. With FireShot you can edit anything that can be copied to your clipboard!
— Printing. Browsers sometimes do not print documents exactly as you want them to. FireShot Pro will give you the exact printout you want.
— Custom bitmaps for watermarking.
`
You can give a try to the full Pro Version with a switch and use it for free in a 10 day period. The Pro Version features will be automatically turned off after the trial period runs out. This means that you will continue to use the program as free version. You can purchase the Pro key by following this link: https://getfireshot.com/buy.php.
You can activate the Pro version in a few simple steps:
You'll need to switch to Pro mode if you haven't switched yet. To do this, please open the FireShot menu and select "Switch to Pro!":

You'll see either the message saying, "You're completely switched to Pro" or you'll be asked to enter the purchased code in the "Enter license key" dialog row. To open this dialog window manually, please select "Enter License Key..." menu item in the FireShot menu.
Use Clipboard "Copy" & "Paste" (CTRL C & CTRL V) operations to quickly enter the License or Activation key purchased, then press OK.

Open the Editor (by capturing anything and opening in the Edit window) and click the "About" button.
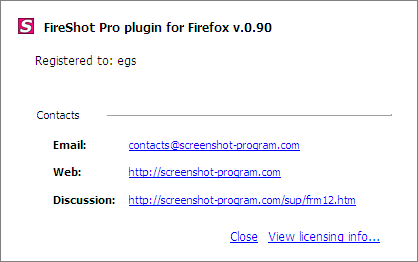
Notice your licensing info:

Congratulations! Now you have FireShot successfully switched to Pro and registered it!
Capturing webpages
Traditionally, there are several ways to capture the webpage. You can use the red "S" button located at the top right corner of your browser. Clicking on the button provides the default capturing method and action ( "Capture entire webpage and Edit"). Alternatively, you can specify the "Area" to be captured and a further action, by clicking the arrow located next to the red "S" button. You can also use the "Main Menu" or the "Context Menu". Finally, the group of icons located at the browser's right bottom corner can be used as well.
You can capture different webpage areas by selecting one of the variants:
— Clicking "Capture visible Area and..." will grab only the visible part of the webpage.
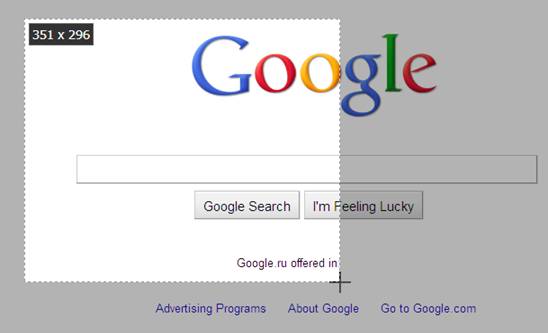
— Clicking "Capture Selected area and..." will provide you with a selection instrument to specify the area to be captured:
— Clicking "Capture entire Page and..." grabs entire web page including the areas that you cannot see without scrolling.
— And clicking "Browser window and..." will capture the browser's window including its contents.
One of the great features of FireShot is the wide choice of the variants of processing the captured content!!
The content can be opened with the built-in Editor, quickly edited to fit to various social site rules and annotated and then can be:
— Uploaded to Picasa, Flickr, ImageShack, custom FTP or HTTP Server
— Saved to disk as PDF, PNG, GIF, JPEG, BMP
— Copied to clipboard
— Printed
— E-Mailed
— Exported to external editor
Editor window
What makes FireShot a really powerful tool is the built-in Editor that provides a set of tools for editing and annotating the captured content quickly and efficiently.
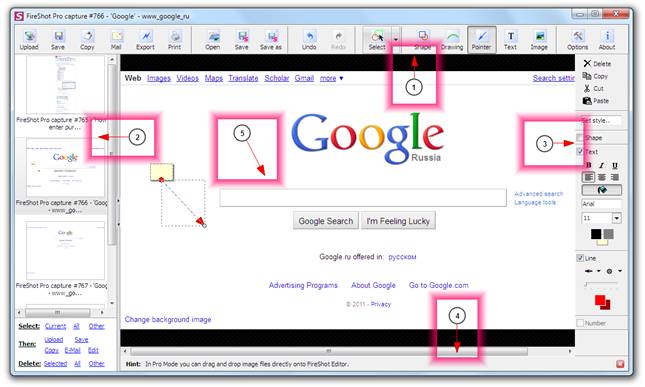
The screenshot below shows how exactly the Editor window looks like:

The editor consists of the following sections:
1. Tools panel
2. Captures list
3. Object style editor
4. Hints panel
5. Editor's workspace module
The Tools panel contains the buttons providing fast access to the Editor's features. The buttons are grouped according to their functions:
1. Upload, Save, Copy, Mail, Export and Print buttons provide uploading, saving to disk, copying to clipboard, e-mailing, exporting to another Editor and printing functionalities.
2. Open, Save and Save as buttons are designed to work with projects. A project is a file containing a set of captures.
3. Undo and Redo buttons.
4. Select button switches Editor's mode to selection either the object or the area.
5. Shape, Drawing, Pointer, Text and Image buttons provides access to fast annotation objects creation.
6. Options and About buttons.
The Captures list holds all the captured web pages. You can switch between the captures by selecting the thumbnails in the Captures list.
The Object style editor provides fast access to the various properties of the annotation objects. It is possible to specify an object structure, colors, size of the font and many other visual properties.
The Hints panel contains various useful hints. You can close this panel by clicking at the "x" button located at the right of the panel.
The Editor's workspace holds the captured contents and performs various operations with it.
Editing captures
FireShot is one of the best tools to quickly add annotations (shapes) and perform quick corrections (bitmap tools) to the captured web pages.
Shapes
Various shapes have been developed to quickly and effectively annotate captured screens. They're placed in a separate layer and can be modified or removed at any time.
To add a shape, press one of the buttons (Shape, Drawing, Pointer or Text) and create a selection with your mouse or touchpad at the Editor's workspace.
— Text and Shape tool: allows you to highlight the fragment using Rectangular or Elliptical shape and annotate it. This tool is useful when you want to apply annotation to the fragment of your capture and you want to specify the boundaries applied to your annotation.
— Text and Freeform Drawing tool: allows you to create freeform drawings and attach text messages to them. It's useful when you want to create unique / custom made objects.
— Text and Line tool: allows creating a pointer with text description. It is useful when you want to quickly point at something.— Text tool: provides a text box for simple annotation. It is useful when you want to simply leave a comment.
Bitmap tools
What if you need to hide some content from the capture or apply an artistic effect to some areas at the captured content? The solution is to use the bitmap tools available at the right side panel: when you create a simple selection using the Pointer tool:

Graphical tools that work with selections
Crop tool: cuts off everything that is outside of the selection. This tool is useful when you want to exclude something from your screenshot.
Fill
tool: fills the selected area with specified
color. You may use "Color Picker" to select a color from the captured screen.
This tool is useful when you want to totally exclude something from your
screenshot.
- Gaussian blur tool: blurs selection so that it's impossible to say 100% what you
see. This tool is useful when you don't want to totally remove something
or you just need to make it non-readable.
- Grayscale tool: converts colors to grayscale. This tool is useful when you
want to send something to the background as a minor content.
- Color Inversion tool: inverts colors inside the selection. This tool is suitable
for highlighting.
- Glowing edges tool: creates glowing edges around the selection. This is very
spectacular tool to attract somebody's attention to one detail or even few
details of your screenshot.
- Interlace tool: interlaces selection. This tool is useful when you want to
mark something as less important or secondary content.
A combination of these effects can be
applied to the image for getting more attractive results. The following
screenshot shows the Gaussian blur, the Grayscale and the Glowing edges effects
sequentially applied to the picture.

Storing captures
All the stuff described earlier would be useless if FireShot wouldn't be able to store the edited content. Happily, it does more than simply saving files to disk in PDF, PNG, JPG, GIF or BMP formats.
Uploading
The Upload button provides the access to the upload dialog:

You can choose whether the upload should be performed to EasyCaptures, Flickr, Picasa or ImageShack services or setup a custom HTTP or FTP server.
Some services like Flickr and Picasa will require an authorization to be performed before you start the uploading process, some services like EasyCaptures go smoothly as to "out-of-the-box" idea.
You can specify additional information like Title, Description or Tags to be sent along with the captured content. Additionally an image type or size and proxy settings can be set up using the buttons at the bottom panel of the dialog.
Saving
The Save button opens a dialog that will set up some parameters used while saving your captures.
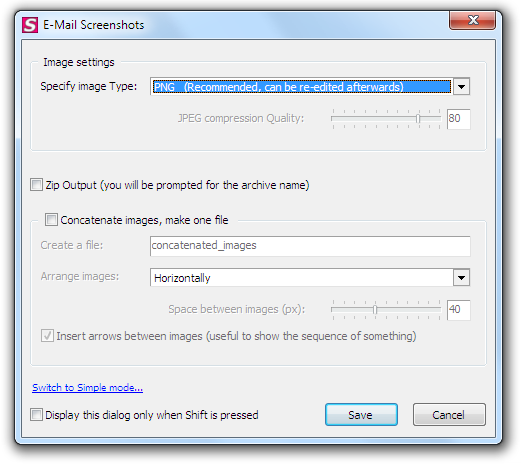
It's possible to specify whether FireShot should ask for the Destination folder each time when the captures are being saved or, should the captured screenshot be stored at one location. A Document type (PDF, PNG, JPG, GIF or BMP) can be specified. If you choose JPG extension, the JPEG compression quality parameter can be altered as well.
Advanced options include packing of the captures into ZIP archive and Image concatenation feature. If the image concatenation feature is checked, every captured screenshot will be drawn to one canvas and saved as one image file. It's possible to specify whether the captures are arranged vertically or horizontally and if arrows are inserted between the images.
This dialog can be skipped when you press the Save button in the Editor window. To do this, please, check the "Display this dialog only when Shift is pressed" checkbox before pressing the Save button in this dialog. In that case, hold the Shift button down each time you want this dialog to be displayed.
Copying to Clipboard
The Copy button places your capture into Clipboard buffer.
Sending via E-Mail
The Mail button opens the dialog similar to the one opened with the Save button.
Exporting to third-party editor
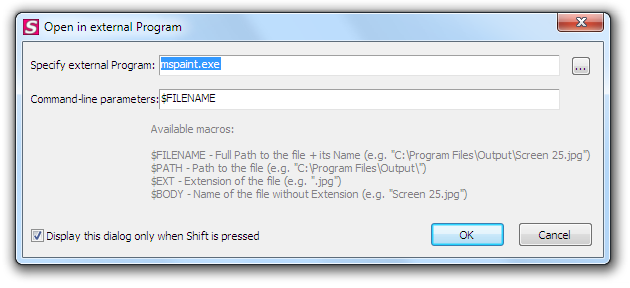
The Export button provides Export feature of the captures to third-party applications for advanced Editing.

The path to the external program could be specified as well as the command-line parameters used to specify how this program opens the stored capture.
Printing
The Print button is used to print the captured contents.

View Demo
This short demo shows how to capture web page, quickly edit and save the capture.